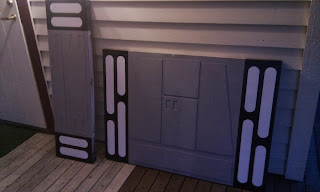
With two upcoming conventions this fall, I took it upon myself to make this wall.
I started out with buying a standard panel of thin plywood, and sourced some leftover vinyl floortiles from my job, to make the geometric shapes on the wall (thanks Marius!).
I used the picture of the above wall and the below rendering to figure out the measurements:
Taking notes on a printed out version, always convenient when working on something like this:
I used the size of the DLT-19 heavy blaster to figure out the measurements of the wall, as the length of the DLT-19 is easily available. I found out that the wall I used as reference was wider than the plywood panel I bought, so I was going to have to thin down everything just a little, to make it work with the panel and be as convenient as possible
Next I started cutting out the shapes of the vinyl tiles:
This took quite a while and was strenuous work, as the tiles gave me a bit of a fight, being so resilious and made to take a beating. I got them done in the end anyways and laid them out and marked off their positions, before putting good old E-6000 glue on the backs and glueing them down:
When the glue had dried I sprayed the panels with gray primer, sprayed the one square shape red, and glued on 2x2s to stiffen the boards from the back:
As you can see on one of the above pictures, I ended up using a different brand of primer for the edges of the two larger panels (as I used up all the other primer, and this primer was just sitting there, ready to be used). Which turned out to be a costly mistake, as the white paint I painted on afterwards reacted with the different brand primer and wrinkled up. I tried letting it dry, giving it a light sanding, and sand away just the wrinkles before putting on another coat of white, but that didn't work.
So I ended up having to sand down the entire sides of the larger panels and prime with the original primer before painting white. A mistake that took both many hours and cost me a few extra cans of paint.
For those of you planning to do something like this, I'd recommend just buying a can/bucket of paint and brushing/rolling it on, as it would be cheaper and probably take less time. I opted to use spraycans, as that was what I was comfortable using, and it gives a great smooth result.
So, back to the program: When the grey paint/primer had dried, I masked off along the sides and sprayed the sides white, letting that dry and then drawing in the oblong shapes and masking them off:
By this time the Torucon Convention in Trondheim was fast approaching, so a fellow trooper, TK-3444, helped transport the wall down to troopers Rita and Ole Sivert, where they helped paint the sides/edges black:
Now it's really starting to look like something.
I spent the next afternoon drilling holes through the woodbeams on the back to be able to mount the boards together using bolts and wingnuts (note the 0,5 liter can for scale at the bottom):
We managed to have it ready in time for Torucon! I opted to drill 8mm holes behind the blasters and use 7,5mm reusable zip-ties (buntebånd) to attach the blasters. I see the wall I used as reference had attached the blasters the same way. On the one hand it is very discreet, and easy to use, but on the other hand it leaves holes all over the wall that can be a bit annoying if left unused. As a side-note: some troopers at the convention suggested getting wood polugs to plug the holes not being used, which was a great idea.
I kept a build log going over at the Nordic Garrison forums, and fellow troopers helped brainstorm ideas for attaching the blasters. We went through neodyme magnets (which I actually tried but found out not to work), acrylic pegs into predrilled holes and a few other different options, but nothing was as simple and effective as the zip-ties.
Here is the finished wall at the convention:
And here I am (with a mannequin behind me) beside the wall:
It ended up looking great, and it really gave our stand an extra oomph!


